Everything you need to get started on the IMBB Bioinformatics HPC cluster: access, storage, Slurm scheduling, and best practices.
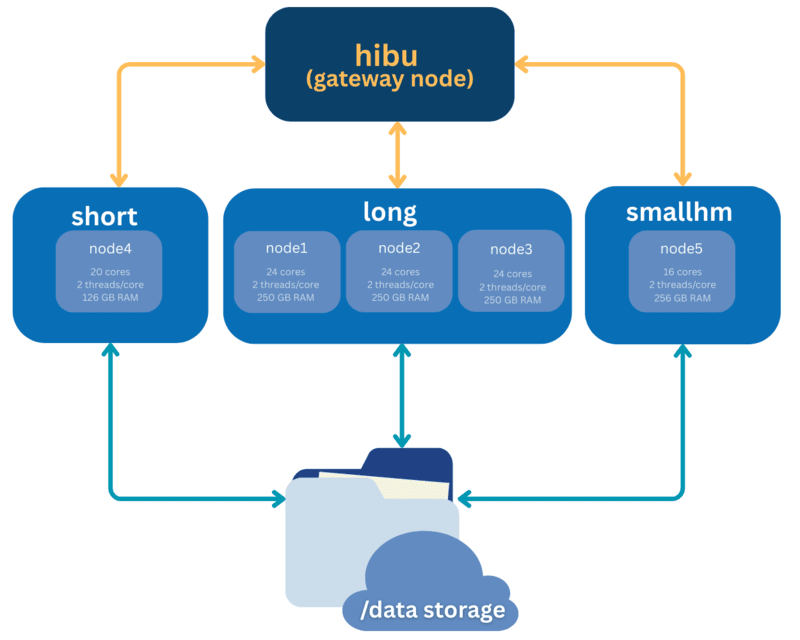
HIBU is a high-performance computing (HPC) system consisting of four compute nodes organized into two partitions. Job scheduling is managed by the Slurm scheduler. A dedicated head (login) node allows users to prepare scripts, submit and cancel jobs, and transfer data. HIBU uses a NAS with a total capacity of up to 42 TB.
longlong, short, smallhm/home/{USER}/ · SCRATCH /data/{USER}/| Partition | Nodes | Cores / node | Threads / core | RAM / node | Hostnames |
|---|---|---|---|---|---|
| long Default |
3 | 24 | 2 | 256 GB | node1, node2, node3 |
| short | 1 | 20 | 2 | 126 GB | node4 |
| smallhm | 1 | 16 | 2 | 256 GB | node5 |
hibu.imbb.gr or 139.91.75.141), and port in PuTTY.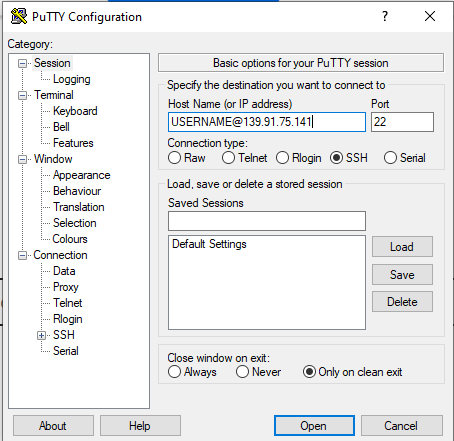
Open a terminal and connect via SSH:
ssh my-username@139.91.75.141
When connected you will be prompted for your password and a one-time code from Google Authenticator.


/home/{USER}: small quota, for configuration files and scripts only. Not backed up./data/{USER}: fast, large (42 TB total). Use this for all analysis input/output. Not backed up./data/{USER}. Running I/O-intensive jobs from $HOME degrades performance for all users.scp local_file.fastq.gz username@139.91.75.141:/data/username/ rsync -avP local_data/ username@139.91.75.141:/data/username/data/ wget https://example.org/reference_genome.fa -P /data/username/refs/
sinfo — list the current status of all partitions and nodes.squeue — list all currently running and queued jobs.sbatch <script> — submit a job script to the queue.scancel <jobid> — cancel a running or queued job. Use squeue to find your job ID.sacct — retrieve accounting information for completed jobs.scontrol show job <jobid> — inspect a specific job's details.Common #SBATCH arguments:
--partition=long — target queue (long / short / smallhm)--nodes=1, --ntasks=1, --cpus-per-task=4 — CPU allocation--mem=8G — memory per node; or --mem-per-cpu=4G--time=24:00:00 — wall-clock time limit (HH:MM:SS)--array=1-100%10 — job array (100 tasks, max 10 concurrent)-o slurm-%j.out — stdout file (%j = job ID)Request only the cores and memory you need, leaving the rest available to other users.
#!/bin/bash
#SBATCH --job-name="hello"
#SBATCH --partition=long
#SBATCH --nodes=1
#SBATCH --cpus-per-task=4   # 4 cores out of 24
#SBATCH --mem=8G           # 8 GB out of 256 GB
#SBATCH --time=12:00:00
#SBATCH -o slurm-%j.out

python myscript.py \
  --input  /data/${USER}/data/input.dat \
  --output /data/${USER}/results/out.txt
Ideal when you can split input into independent chunks processed across nodes.
#!/bin/bash
#SBATCH --job-name="array_job"
#SBATCH --partition=long
#SBATCH --nodes=1
#SBATCH --cpus-per-task=1
#SBATCH --mem=2G
#SBATCH --array=1-10       # 10 tasks
#SBATCH -o logs/array_%A_%a.out

PARAMS=$(sed -n "${SLURM_ARRAY_TASK_ID}p" params.txt)

python simulate.py $PARAMS \
  --seed ${SLURM_ARRAY_TASK_ID} \
  --out  results/${SLURM_ARRAY_TASK_ID}.json
# Submit first job and capture its ID
jid1=$(sbatch jobA.slurm | awk '{print $4}')

# Submit second job only if jobA exits cleanly
sbatch --dependency=afterok:${jid1} jobB.slurm
sacct records to calibrate.--cpus-per-task for OpenMP, --ntasks for MPI.MaxRSS from sacct after a test run and adjust.-N 1 --cpus-per-task=X.-N N --ntasks-per-node=T.--exclusive unless you genuinely need the entire node. Exclusive allocation reduces throughput and lowers your scheduling priority.# Cluster & queue status sinfo squeue -u $USER # Inspect a specific job scontrol show job <jobid> # Accounting history for a job sacct -j <jobid> \ --format=JobID,JobName%20,Partition,State,Elapsed, \ Timelimit,AllocTRES%30,ReqMem,MaxRSS,ExitCode
Stdout and stderr go to slurm-%j.out by default; customise with -o and -e in your script header.
/data/{USER}/, never from $HOME.--version outputs in logs.squeue -u $USER — the REASON column indicates the cause (e.g., Resources = waiting for resources, Priority = other jobs queued ahead).slurm-<jobid>.out for error messages. Common causes: wrong paths, missing modules, exceeded memory.MaxRSS with sacct and increase --mem in your script.ssh username@139.91.75.141.Copy and adapt the templates below. Remember to replace {USER} with your actual username and adjust resources to match your workload.
#!/bin/bash
#SBATCH --job-name="star_align"
#SBATCH --partition=long
#SBATCH --nodes=1
#SBATCH --cpus-per-task=16
#SBATCH --mem=64G
#SBATCH --time=08:00:00
#SBATCH -o logs/star_%j.out

SAMPLE=$1
GENOME=/data/${USER}/refs/genome_index/

STAR --runThreadN 16 \
     --genomeDir    ${GENOME} \
     --readFilesIn  /data/${USER}/fastq/${SAMPLE}_R1.fq.gz \
                    /data/${USER}/fastq/${SAMPLE}_R2.fq.gz \
     --readFilesCommand zcat \
     --outSAMtype   BAM SortedByCoordinate \
     --outFileNamePrefix /data/${USER}/aligned/${SAMPLE}_
#!/bin/bash
#SBATCH --job-name="py_analysis"
#SBATCH --partition=long
#SBATCH --nodes=1
#SBATCH --cpus-per-task=4
#SBATCH --mem=16G
#SBATCH --time=06:00:00
#SBATCH -o slurm-%j.out

conda activate myenv

python myscript.py \
  --input  /data/${USER}/data/input.csv \
  --output /data/${USER}/results/
Email the support team with your affiliation and intended workloads to request access.
hpc-support@imbb.forth.gr